HOW TO: STENCIL BRUSH TECHNIQUES & EFFECTS
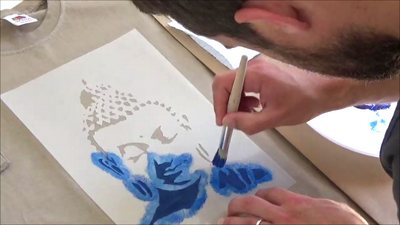
Hello again from Ideal stencils today we are going to be looking at some of the effects that you can achieve using a stencil brush. A stencil brush is different from a normal paint brush because it has a circular head of stiff packed bristles that is designed to stop paint from getting under your stencil. You don’t need to use a lot of paint while stencilling… always remember to wipe extra paint off your brush! Paint can be applied using an up and down pouncing motion or a swirling motion depending on your project and desired effect. You can also use a dense foam paint roller, spray paints or many other mediums to put through your stencils and transfer the design. Stencilling is fun, creative and addictive and they can be used to paint whole walls or to add decoration in other smaller projects.
We are using our flamingo stencil for the following examples.

Block stencilling is where you simply fill the whole area in with flat even colour. This is great for the boldest look. We pounced up and down over the stencil area to do this. You can also achieve this more quickly using a dense foam roller which would be recommended if you were repeating this stencil many times, say over a wall area.

Here we have added to the above and used a smaller brush to shade round the edge of the stencil using a slightly darker shade. This creates a more defined motif with more depth

Use a very dry brush and very lightly pounce up and down over the stencil to create a speckled effect that is quite soft and delicate

And here we have simply gone lightly round the edges of the stencils opening to again add more definition to the flamingo motif.

You can simply pounce around the edges of the stencil leaving the middle blank to outline the shape. Use less paint for a more subtle outline.

With the above we used the swirling technique to produce a soft finish. Without taking your brush off the surface swirl the brush with light pressure in a circular motion paying attention to the out side edge of the design and leaving the middle with little or no paint on. Your brush wants to be almost completely dry for this, its surprising how little paint you need to create the image. The result is dry instantly as you have used so little paint. As you can see in the image below this would look great repeated as a pattern.


This one was a bit more experimental. I added some black to my stencil brush and brushed back and forth quickly. You can see where the paint has caught more in some areas. I liked this one the best, its much more unique and below I added some pink on top to make it look more colourful and textured.
 Brushes come in many different head sizes and as a rule use a brush size that works for the stencil size and purpose you want it for. So using a large brush for a stencil with large openings would make sense.
The above is certainly not a definitive list of effects that can be achieved but it shows that you can use your stencil, brush and paint to create different looks. Have a go for your self and have fun experimenting and seeing what effects you can create with your stencils and different types of paints and mediums.
What stencilling method do you like to use for your stencilling projects? Do you use brushes, rollers, spray paints, sponges, let us know what works for you and why, we would love to hear your comments.
email – info@idealstencils.co.uk
Leave a comment