Scallop Border Wall Stenciling
Hi there stencilers! Just another post to show you how simple stenciling is and how effective it can be to transform a room - We used our 100cm Scallop Border Stencil for this project... lets not waste time with any more tittle tattle lets get on...
To see the video project then please click here HERE
PREPARING/ MATERIALS

This is a selection of tools you might need for this project - or any other stenciling project - everything bar the stencil brushes should be available from any good local decorating shop.

With any wall project start by masking all the areas where you do not want to get paint - skirtings, door frames, adjoining walls etc

Next decide what height you want the scallops to be at on the wall - you can do this by placing the stencil on the wall and seeing how it looks... your scallops are going to sit on this straight line and so ensure the line is a good few inches below the top of the scallop shapes - Use a spirit level and a light pencil to dash a straight line across the wall.

Here you can see we are positioning the stencil with the bottom of the scallops on the straight line and using pieces of low tack decorators tape to secure in position.
TIP - If you want you can use respositional spray mount on the back of the stencil to help it cling to the wall better ( 3M brand is recommended and walls must be smooth)
TIP - If your stencil comes out of the postage tube with a curl to it - then just roll it snugly up in the opposite direction to the curl and leave over night to tease out the curl.

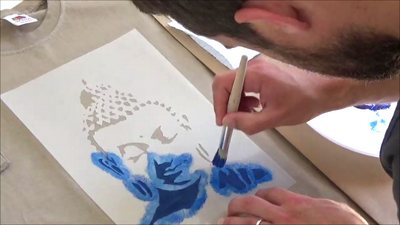
We are going to use a stencil brush to create the scallop shapes on the wall. You could also use a dense foam roller to roller them in , but we like the control of using a stencil brush. See above how we load our brush with paint, but then give it a good 'dab off' onto kitchen roll to offload any excess paint - you don't need alot of paint on your stencil brush otherwise you may get blotchy edges with paint seeping under the stencil.

Here we are starting to paint in the scallops... use an up and down stippling motion with a slight brushing motion inwards from the outside of the plastic area into the open scallop shapes - this way we ensure no paint gets under the stencil. We just painted 2-3 inches inside the scallop shapes to get them on the wall - you can choose to paint the whole area in, its up to you.

You can carefully remove the stencil as soon as you have finished painting. Because you have been using light application of paint using your specialist stenciling brush you will find that the paint is pretty much dry to the touch already... you may want to give a quick blast with a hairdryer on medium warm heat - but you should be able to go straight on with the project with no delay and lay your stencil over the top to do the next repeat along...

So here you can see we have aligned the stencil over a previously painted scallop shape to continue the pattern.
TIP - As the stencil is very open in design it might feel awkward and flappy to handle. To overcome this see how we have added small connecting bits of tape on the stencil ( indicated by arrows on the above image) This really helped make the scallop stencil easier to handle and position. Just remove them before painting.

Here we are bending the stencil against a door frame to paint into the corner - this is as simple as just holding it in with your finger and painting - you would be able to use this method if you are wanting to paint the scallop design around corners onto other adjoining walls.

The project is coming along nicely and almost ready for the next stage...

Next job is to get out a standard painting brush and fill in the rest of the scallop shapes just like Michaela has done here. Overlap a bit of what you have already painted and paint down to just below the scallop line all the way along.

Next use your same brush and cut in few inches all around the edges of the area. The low tack painters tape is great as you can paint over it and then peel it off at the end to reveal nice crisp lines. This step sets you up for the next stage - the big roller fill! ...

Get out your paint tray big wall roller and paint tray and start filling in the rest of the space down to the skirting. So satisfying to roll in the large area and be on the home straight to completion! - You may need 2 layers - just wait for the wall to completely dry and then assess it and see if you need another layer or not.

WE LOVED DOING THIS PROJECT. It was simple and fun. We loved the tone of the blue colour we chose. That's the cool thing about stenciling you can really personalise things and it starts with being able to choose the colour to fit your scheme!
What would we have done differently in hindsight?
If we were to do this project again then we would have filled in the whole of the scallop shapes using the stencil brush rather than just painting it a little bit to make the outline. When we painted the shapes in fully using a normal painting brush, because of the difference in brush texture, you could see the brush strokes more than you would have done if we had filled in the shapes completely when stenciling. It is not a big thing, but just something we noticed.
We hope you have gained an insight from this tutorial and please send us your project images so we can share them with others.
For now thank you for reading!


Leave a comment