HOW TO USE A STENCIL BRUSH
Hello world! Ideal Stencils here, the home of all things to do with stencilling. Today, on the back of our blog entitled ‘All about stencil brushes‘ we are going to be showing you the basics on how to use a stencil brush. We are going to be using our flamingo stencil to show you how it’s done, then once you have the basic stencilling technique down to a T you can go forth with your stencilling projects with confidence and flare.

Basic tools for a stencilling project
- Stencil
- Stencilling brush
- Paint ( acrylic, emulsion, NOT cheap and watery poster paints – arrrghh!!)
- A polystyrene or similar plate to put the paint on
- Something to adhere the stencil to the surface – repositionable spray mount/low tack tape
- Kitchen roll to off load your stencil brush
- OPTIONAL – Pencil, spirit level, fine line touch up brush

Adhere your stencil using repositionable spray mount
Spray the back of your stencil using the repositionable spray mount. (Do this onto some blank paper or newspaper, not on your nice carpet as it will make it sticky!) We love this stuff! It keeps the stencil flat to the surface, the 3M brand is great because it sprays out nice and clean (so many others spray out like silly string…what’s all that about??) and it doesn’t leave any residue on the wall. If your doing a large stencil or repeating a stencil over a vertical wall area we would also recommend securing all corners and sides with a piece of low tack tape also.

Position your stencil
Position your stencil making sure that all the smaller areas are stuck down. If you want to be really precise and if you’re doing a large wall stencil motif you may want to use a spirit level to check its straight.

Load your stencil brush with paint
Next it’s time to load your stencil brush. Swirl your brush into the paint so that the paint is absorbed up into the bristles and then off load the brush onto some kitchen towel. If the brush has too much paint on it then what’s going to happen?… That’s it! The paint is going to bleed under the stencils cut out edges and when you peel off the stencil your stencilled design it will have blotchy, unsightly edges. (If your not confident it may be worth just having a practise on some card first before you start a project)

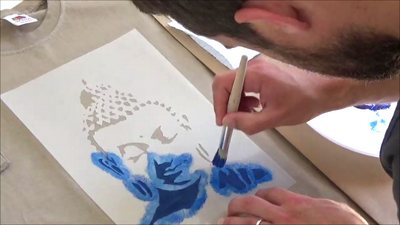
Paint your stencil using your brush / stippling technique
When your stencil brush has been off loaded it time to get on with the fun job of stencilling your chosen design. The main method of painting with a stencil brush is to use the stippling technique, others call it pouncing, it’s the same thing. This means holding the brush at 90° to the surface and using an up/down motion to dab the paint over the stencils cut out areas.

Reduce paint bleed while stencilling
I like to start stippling on the outside of the stencil and work my way into the cut out areas with a slight brush inwards as this also stops the paint from bleeding under the stencil. Use a light to medium pressure to start with and increase pressure as your painting, when your brush needs it, swirl it back into the paint, off load it onto the kitchen roll and resume stencilling until the design is complete. This method paints the stencil using one block colour. There are other stencilling effects you can achieve with a stencil brush but I will cover those in a future blog… this is basic stencilling to get you started.
When the design is finished (you may or may not add more than one layer depending on what paint you are using and the effect you want to achieve) you can peel the stencil off without needing to wait for it to dry.

Repeat your stencil to create a pattern
You can then reposition the stencil somewhere else (if you are wanting to repeat that is) and paint it again, and again and again… One simple stencil can be repeated over a whole wall area to create a beautiful hand painted wallpaper effect – making it a great cost effective, and more unique alternative to wallpaper.

I think that has covered all the bases of stencilling with a brush. Top things to remember for crisp stencilled images:
- Use repositionable spray mount for best results
- Don’t have to much paint on your brush (you can always add more if necessary)
- Stipple in from the edges of the cut out areas
- Use a decent quality paint – acrylics, emulsions NOT cheap kids poster paints!
Stencilling is fun and easy, and what you want to use them for is entirely up to you. They have many uses, but this brush technique is the same weather you are painting a wall, a T-shirt or a even a pig (but then you might want to get a friend to sit on it… if it moves to much that could cause paint bleed, resulting in blotchy edges..nasty!)
Happy stencilling!!!! – Be creative, have fun and do it like you mean it!
What was your last stencilling project, or what do you think would be a exciting one to do, what’s on your list? Let us know, we would love to hear it.
Visit us at Ideal Stencils
Follow us on Facebook
or send us an email – info@idealstencils.co.uk


Leave a comment