Herringbone Pattern Wall Stenciling
Materials you will need for any wall stenciling project

Line up your first repeat on your wall. Make sure the stencil is level. Choose a place where you can do an un-interrupted row for ceiling to skirting as this will give you a nice row to work from

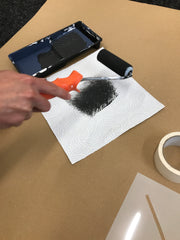
Make sue you don't use too much paint on your high density foam roller - roll it off on some kitchen paper - the roller should not have any visible blobs of paint on it and should just feel damp to the touch.

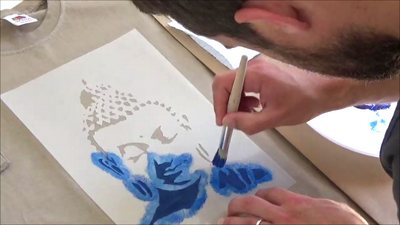
Align the stencil with previously painted areas ( always refer to the listing images to see how each stencil aligns ) and paint your pattern over your wall area. Leave tricky parts where you have to bend the stencil, like into corners and skirtings and do these areas last.

If the build up of paint is effecting your results then give it a clean in the sink or bath, use warm soapy water and then make sure it is completely dry before using again.

The stencil can be taped and bent into corners - use your roller as much as you can and then finish right into the corners as best as you can using a small stencil brush

If you need to cut up your stencil for finishing areas - then go for it - we cut ours down to save us having to bend it into the corner which made our life easier

How ever much of a Stenciling God you are - you will get areas of paint bleed under the stencil - so just go round with a little brush touching up any areas that catch your eye

See our final look below - We liked the bold modern, monochrome pattern, but you can use any colours you want to - like more muted tones of colours - that is the great freedom of stenciling - you can make your walls reflect your unique tastes and make it more YOU

Hope this helps someone on their project and educating you in using the products is important for us :) - follow us on instagram @idealstencils and keep up to date with new projects we are doing


Leave a comment