SPRAY PAINT A BANKSY STENCIL
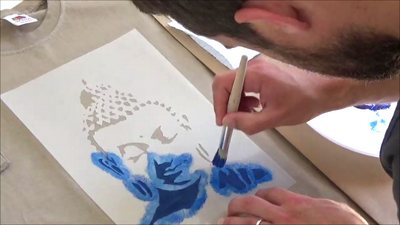
Welcome back! Today’s blog from Ideal Stencils is going to be all about spray painting your stencils. If you want to see this tutorial video then click this link – https://www.youtube.com/watch?v=m_A5RpCQTvg In this tutorial we are going to be using our Banksy Che Guevara Stencil and painting it on an interior wall, the same methods will apply for whatever stencil you are using. Spray painting your stencil is a quick way to paint your stencil, an image can produced in a matter of seconds (depending on the result you want to achieve). If you like your graffiti stencil art then you will know that stencils and spray paints go hand in hand and they have their own unique visual aesthetic and identity. That’s why we thought using a Banksy stencil and spray painting it authentically would make good sense. Enough talking, lets start…
Materials needed to spray paint your Bansky Stencil

A Banksy stencil, some spray paint, a suitable mask so you don’t breath in the spray paint particles, some repositionable spray mount or low tack painters tape for adhering the stencil to the wall and some newspaper for masking off our surrounding area. You may also want to use a dust sheet for floor protection and disposable latex gloves.
Make your stencil tacky so it sticks temporarily to the wall

We like to use the repositionable spray mount on our stencils as it gives you a nice secure temporary bond between surface and stencil. You don’t have to use loads of this stuff, just a light spray over the back of the stencil will be enough. Because this is a Banksy graffiti style stencil and you may not be too concerned about a crisp resulting image, so you may opt to use just the low tack tape to hold your stencil to the wall.
Position your stencil where you want it

Position you stencil and push it down to the surface also making sure that any smaller detailed parts of the stencil are also pressed down.
Mask off the surrounding area to protect it from spray paint particles

Mask of the wall area well using the newspaper all the way around the stencil. If you don’t mask off then you will get a shadow line around the edges where the spray paint particles have landed on the wall. We also taped a dust sheet to the skirting board and the carpet area as spray paint particles will bounce off the wall and fall down onto the floor as your spraying, also protect and cover nearby furniture.
Spray paint your stencil
We are going to show you the best way to spray paint your stencil to achieve a crisp and even stencilled image. Use this as a guide and retain the useful points. We understand that you may want to paint your stencil differently, for example you may want to produce a more uneven and rough stencilled image to reflect the stencil graffiti style look. So all the following may or may not apply to your project.
Test and get a feel for your spray paint can
Firstly shake your can up well and do some test sprays onto some newspaper this will 1) make sure that the spray paint is spraying out cleanly with no blockages and 2) will give you an idea of how far away from the stencil you are going to want to spray from.

Spray painting technique for a crisp image
Holding the can at right angles to the surface spray in short bursts, repeatedly depressing and releasing the spray paint cap, working your way over the stencils cut out areas. DO NOT spray too close OR on the same area for too long, doing this will cause overspray (blurry edges) and risk the paint pooling and dribbling under the stencil.

Once you have done one layer you will probably need to do another so go back to where you started and spray another layer using the same technique.

I like to do one final layer by sweeping my arm back and forth over the stencil from left to right, right to left etc, spraying as I go. This gives the last layer a smooth and even finish.
Reveal your painted Che Guevara image
This is the most exciting part of the whole process. You’re hoping for a nice clean, crisp image and you cannot wait to see the results. If you’re like me and impatient, the good news is you don’t have to wait for the paint to dry!
Carefully remove the newspaper with out disturbing the stencil. And then remove your stencil to reveal your painted Che Guevara image.

That’s a pretty good result. I have got a slight bit of overspray here and there, but nothing to bother me. I’m definitely happy with that!
What is overspray?
Overspray is when the paint spray paint particles hit the surface and bounce underneath the stencils surface giving the appearance of blurry edges to your stencilled image. To reduce the risk of overspray: make sure that your stencil has a good close contact with the surface, especially around the stencil openings, spray at right angles to the stencil and DON’T spray too close!

Spray painting your stencil is quick and fast. As mentioned using spray paints go hand in hand with stencil graffiti art, so if your wanting to get into that scene then you will want to know how to perfect your technique. Thinking more broadly it is also a good solution if you are wanting to mark a lot of items for commercial uses like boxes and packaging. We get a lot of custom stencil requests for equipment marking and labelling stencils.
We hope that this tutorial was helpful and it has offered you some quality guidance that you can take forward and use!
Have you ever spray painted your stencil? What did you paint? How did it turn out? Share your thoughts and let us know!
Visit us at Ideal Stencils
Follow us on Facebook
or send us an email – info@idealstencils.co.uk

Laissez un commentaire